Browsing Category

projects

diy landscaping projects weekend

weekend project: living wall

August 22, 2013

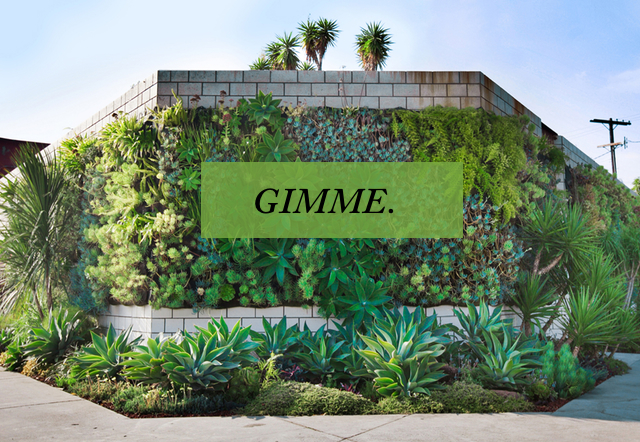
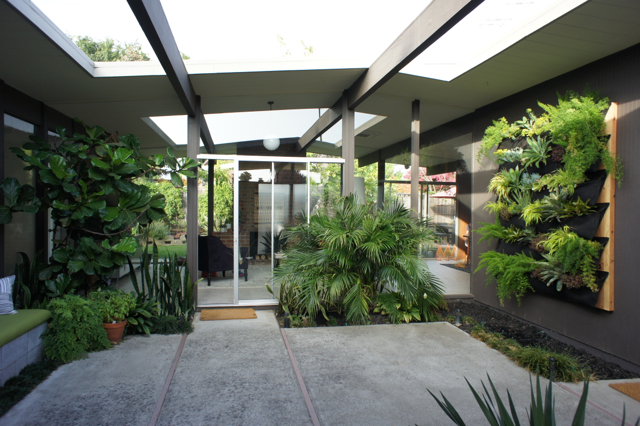
Hi friends!  Finally the reveal you’ve been waiting for:  our living wall!  I’m so happy that it’s done, looking so lush with lots of pretty plants, and, did I mention that it’s done?  Yeah!

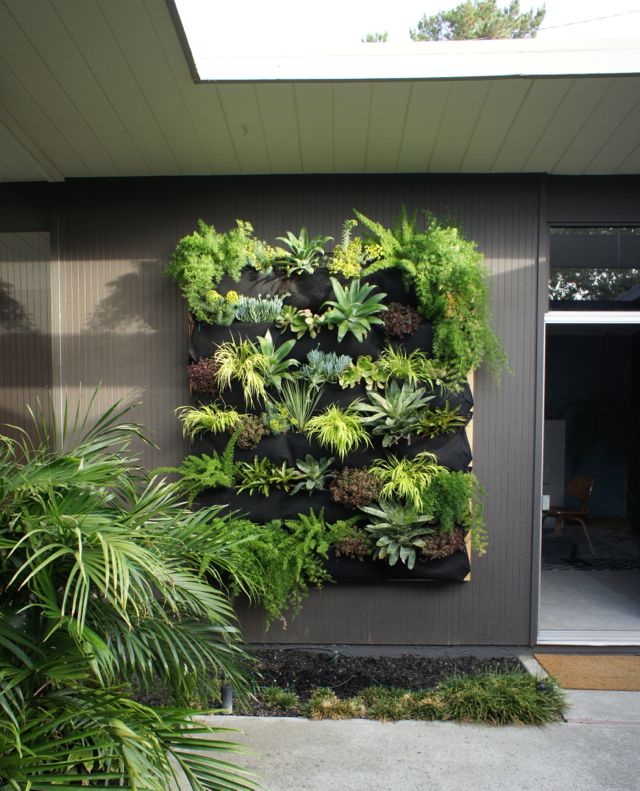
What do you think?  I think I am in love with it.

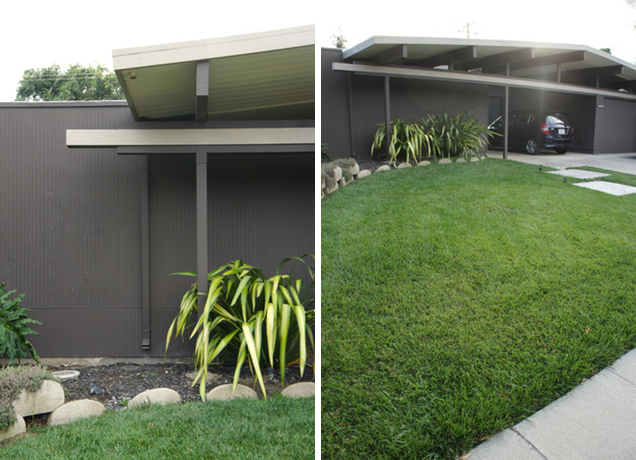
Let me back up a bit to give you the details of how we built this, in case you’re interested in constructing your own.  To start, I wanted to create a wall that would not damage our rather precious and not terribly robust Eichler siding.  This meant not having plants, soil, and moisture right up against the siding.

After some research, I chose to go with the Woolly Pockets since they have an impermeable membrane built into the pocket so moisture is contained.  The pockets are designed to mount directly to a wall, using wall anchors or screws.  However, I didn’t want to put a million holes in our siding and have the weight of the pockets supported by the siding and wall anchors only.  I needed something more sturdy that mounted to the wall studs.  My solution was to design a backing board that would mount to the studs, onto which we would then attach rows of Wally Threes.

Here’s how it came together:

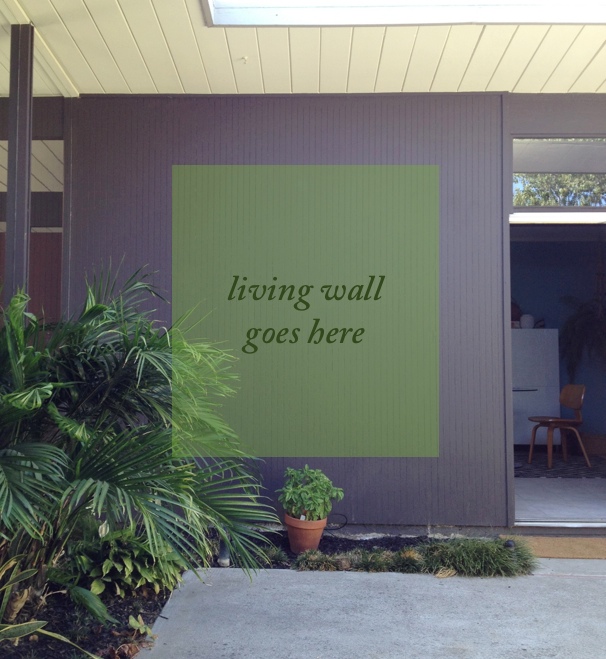
TADA!  When I think back, it was almost that simple.  Before things got serious, I used painter’s tape to convince myself of where exactly I wanted the wall to go:

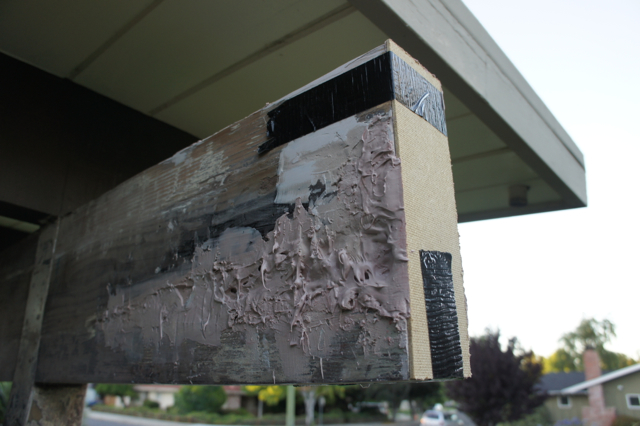
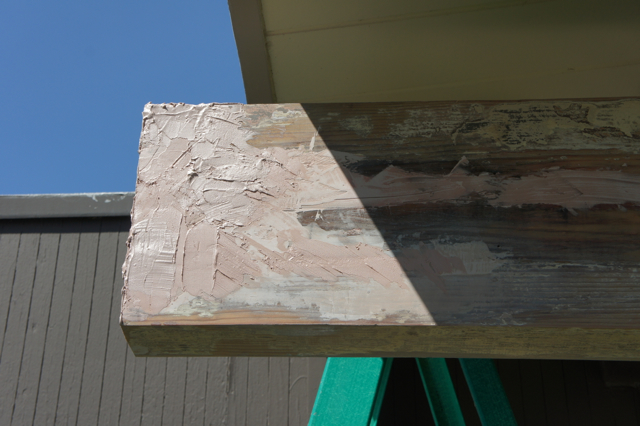
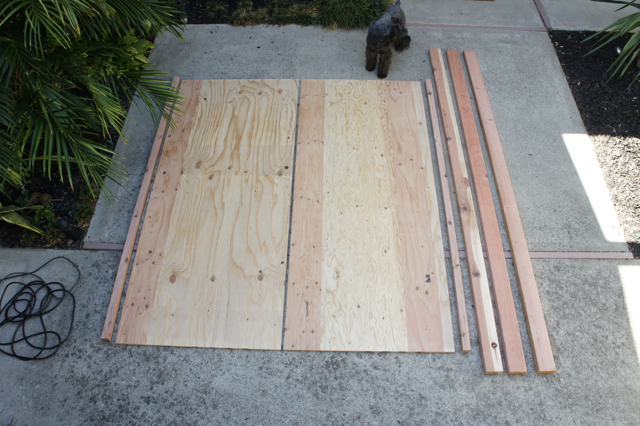
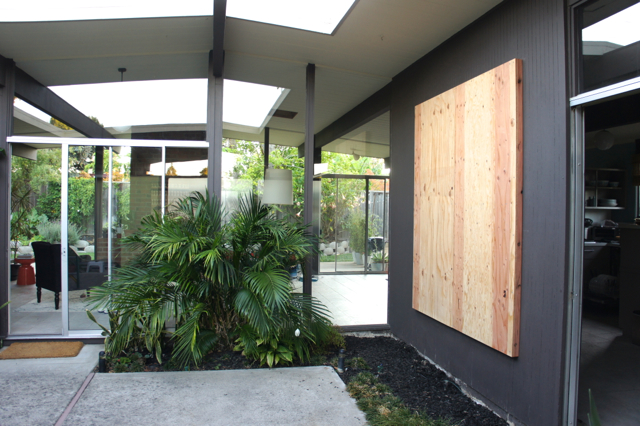
Basic materials included plywood (we used 5-ply, 3/4″ thick), 2×4 redwood lumber (nice dry stuff), and a whole lotta wood screws.  The wall was to be 68″ wide by 78″ tall, to accommodate six Wally Three pockets.

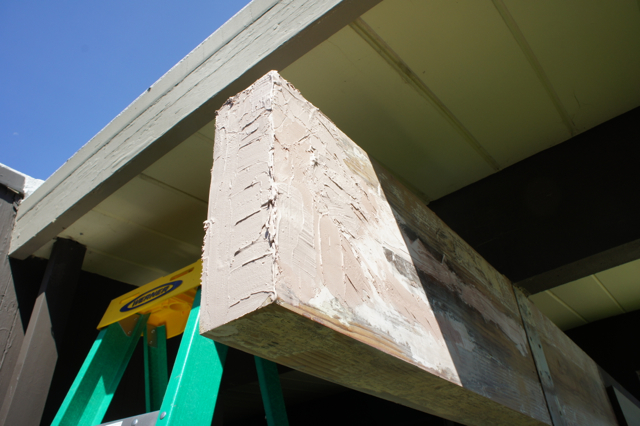
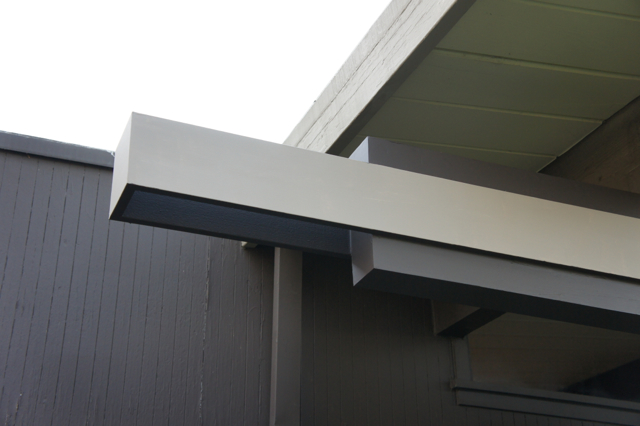
Given the size of plywood at the store, this meant we had two half-panels which we assembled to make the full backing board.  The back was framed using the 2x4s, to give ample space between our siding and the board, and to accommodate a French cleat which was instrumental in getting the board up and attached to the wall studs.

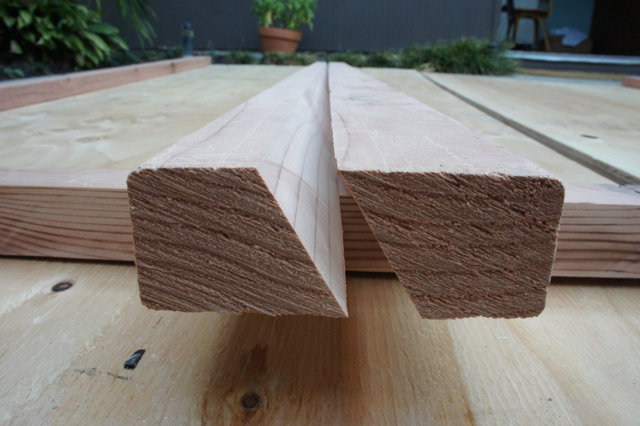
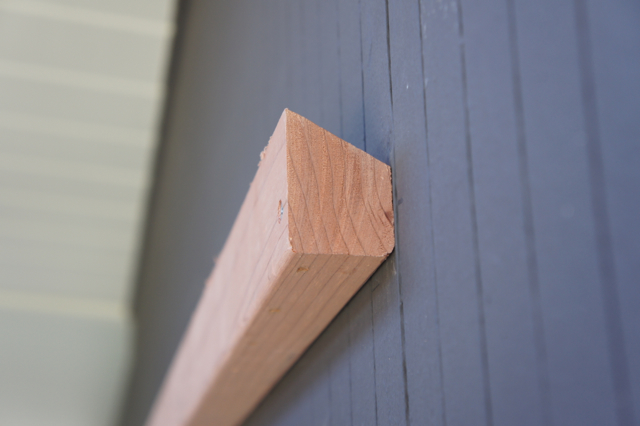
That cleat was magical, I tell you.  And I may be in love with my table saw (Ryobi BT3000, which I bought second-hand!) as a result. The alternative to using the cleat would have been for one person (myself or my husband) to be holding up a giant piece of plywood whilst the other scrambled to drive screws through to hang it.  Painful and totally not fun, I’m sure.

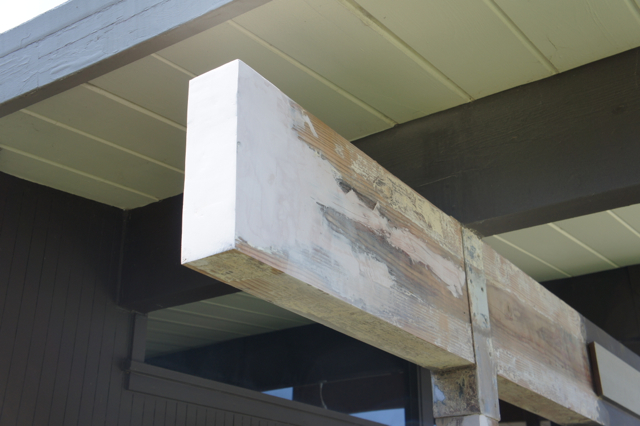
With the cleat, we just attached half of the cleat (pointy edge up) to the wall, driving 3″ screws through into our studs.  We cut the other half of the cleat (pointy edge down) in half, and the two halves went along the tops of the plywood panels.  Lift, hang, and behold!

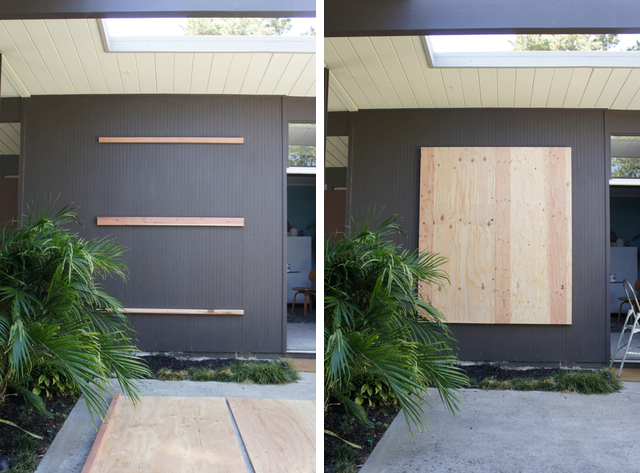
To make things extra-secure, we did attach a 2×4 in the middle of the space behind the wall, and drove 2″ screws through the plywood along the cleat and the 2×4.  That thing is not going anywhere.

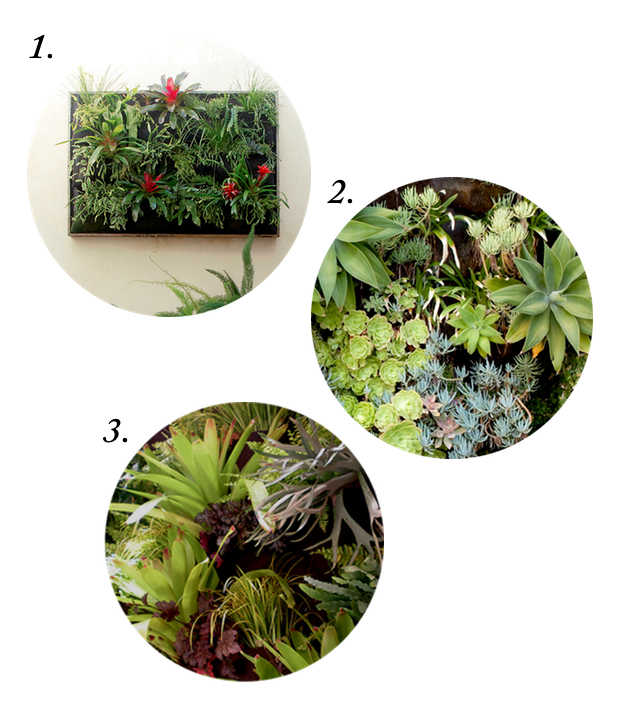
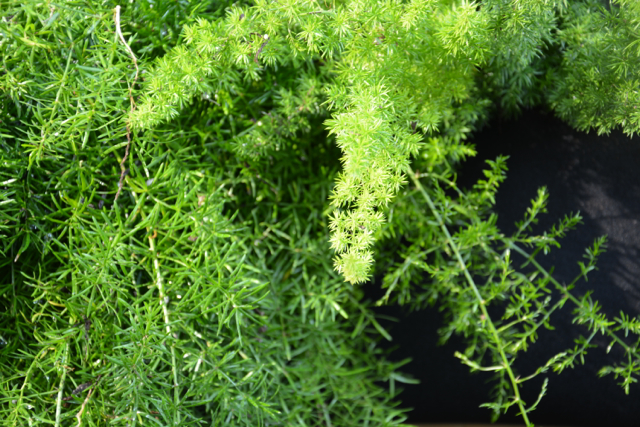
After mounting the backing board, attaching pockets, and running irrigation, we planted.  And planted and planted and planted.  I believe I visited no fewer than four nurseries in the past week, because I really wanted a wall that I loved.  And when I said that I wanted ALL of the plants, I was not joking!

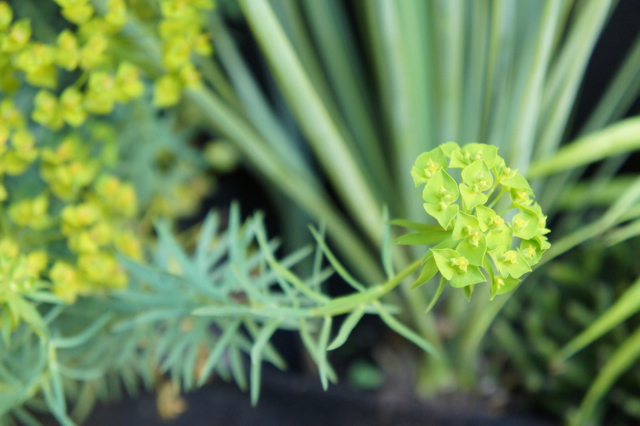
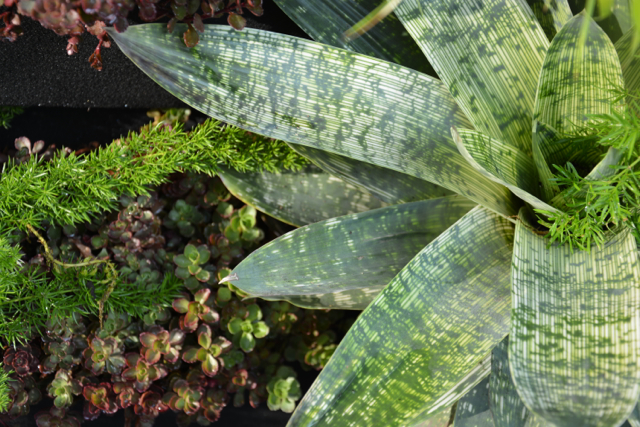
And so, I ended up using the following to fill the wall, mostly from Flora Grubb and my local Summerwinds:

  • Bromeliads (Vriesea Gigantea Nova and Tessellata)
  • Ferns (foxtail and Sprengeri)
  • Stonecrop (‘Bronze Carpet’)
  • Foxtail agave (Agave attentuata)
  • Euphorbia (‘Dean’s Hybrid’)
  • Echeveria (Hens and chicks)
  • Senecio mandratiscae
  • Japanese forest grass (Hakonechloa M. ‘All Gold’)
  • Yucca rostrata
  • Tiny mistletoe cactus (Rhipsalis ewaldiana)
I realize these will not all co-exist happily until the end of time, and the wall will evolve.  We’ll see if the bromeliads are OK with this location or not, as I’ve never dealt with them before.  It turns out that to water them you need to fill up their cups, so we may rig a tiny sprinkler above them in addition to the drip irrigation.  And anything that’s not completely happy can be relocated to other parts of our yard.

Now, I just need some sort of seating from which I can enjoy the wall.  Hanging chair or Acapulco?

(This is not in any way a sponsored post.  And you can find my earlier post about planning this project right here.)

All photos by Karolina Buchner

deciding landscaping projects

deciding: living wall plants

July 31, 2013

For those who are so closely following my living wall project, get excited!  It’s time …. ALMOST.

This past weekend we built the plywood framed backing for the living wall and we’re in the home stretch of this project!  I just have to mount the backing in our atrium, attach the Woolly Pocket Wally Three pockets I got last week, and we’ll be ready to plant.  It’s time for me to make a plan for this major plant purchase (hooray!), but first, I need to decide on the look for my living wall.

I’ve been researching what kinds of plants will do best where the wall is installed.  The wall gets about 4-6 hours of direct sunlight in the mornings and it does get quite warm due to heat being radiated by the concrete floor of our atrium.  We’re running drip irrigation to all of the pockets, so watering should be easy to adjust.

So:  options!  There are many, but here are three that appeal to my taste . . .

1.  A bit of Hawaii:  bromeliads and ferns

Your own little tropical jungle, on a wall.  The punch of colour from the bromeliad blooms is a nice way to add some interest and break up the greenery.  I’m quite drawn to this, but not sure if these shade-loving plants be happy given how much light this spot gets.  Then again, our long-gone bougainvillea was in this spot and never bloomed, leading me to think it’s not too much sun after all.

2.  A bit of Palm Springs:  succulents and agaves

I love succulents, don’t you?  Trailing succulents might be perfect for the wall.  Agaves, on the other hand, might be a bit on the heavy side for a wall installation.  (Have you ever tried moving an agave?  They are dense, water-hogging prickly monsters, trust me.)  Still, here they are, tempting me to try them out as part of my wall.  The installation pictured here, and at the top of this post, is from Smog Shoppe, a really cool event space in LA, with a HUGE number of plants (just shy of 2000 plants, I kid you not!) in Woolly Pockets.  Bonus:  you can check out the full list of the plants used in the case study for this project.

3.  A bit of everything:  staghorns, grasses, and heuchera

This is reminiscent of the walls I saw in person at Flora Grubb.  There are even some lime-green bromeliads in here!  This wall, designed by Daniel Nolan of Flora Grubb, is what started it all for me.  It’s a great mix of textures and colours.  I especially like the silvery look of the staghorns as compared to the other foliage.  And I might add some foxtail ferns in for even more crazy texture.

What do you all think?  Any green thumbs out there with recommendations on what to plant?

All images via Woolly Pocket and Flora Grubb Gardens.

diy projects weekend

weekend project: beam repair part 2 (we did it!)

July 23, 2013

As I write this, Winston is laying beside me, (I think) exhausted from the weekend’s work.  He worked very hard supervising everything, as pictured here in our front yard.  We’ve been busy!

If you recall about a month ago, I posted about the horror of dry rot which we discovered had destroyed part of a beam on the front of our house.  As a refresher, here’s what it looked like:

It still gives me the heebie geebies.

I’m happy to report that this weekend, we finally restored everything back to its original state.  Hopefully, much better than its original state.

Let me walk you through the rest of the process here, which took us actually three weekends to complete.  It’s a long one, so grab yourself a seat.  And maybe a drink.  An iced tea would be appropriate.

Weekend 1:  Epoxy, sand, more epoxy!

As I mentioned in my earlier post, the product we used to fill in the rotten areas was a 2-part epoxy filler.  There are various products available, the most common being Bondo, which we used.  You can find this at big-box home improvement stores and auto repair shops.  Guess where it retails for less.

It’s pretty weird stuff to work with.  You have to work in batches by mixing a small amount of hardener (which comes as part of the kit) with the epoxy material, and then apply it before it sets up.  We found it lasted almost exactly 3 minutes before turning to rubber and becoming unusable.  Also:  it smells pretty toxic.  We wore gloves when working with it and were outdoors in the fresh air.

We worked building it up layer by layer:

It was necessary to sand down the bumps every layer or so, in order to more easily apply the next layer and to make sure there were no air bubbles or crannies left.   We taped a piece of hardboard to the end of the beam to help us form better edges.

Finally, after using about a container and a half of epoxy, we applied the last layer.  I tried my best cake-icing technique here:

Then, we took a sander to it, and BAM.  It looks like a beam again!

The Bondo was really quite easy to work with once we got the hang of it, and it sanded to nice, sharp edges.  One strange thing is that it has a sticky skin even after it’s fully dry, which freaked us out initially, thinking it hadn’t cured.  But, after sanding, it was fine.  I would definitely use it again for jobs like this one.

Weekend 2:  Cut new trim, nail it up, and fret about things not being square!

We considered re-using the original trim (made of redwood!) but sadly it was in rough shape and rotting in a few places too.  So, we ended up purchasing new trim at the hardware store.  We took exact measurements of the old trim and cut new pieces.  This involved chiseling out part of the back of each trim piece to accommodate the metal brace you can see on the pillar above.  Here’s to developing new wood-working skills!

We felt pretty good about making the new trim until we put it up and realized we couldn’t make the end piece line up with the trim.  AT ALL.  It turns out that nailing trim up is the most inexact method of attaching it to your house and we puzzled over this for a long time.  Also, I imagine our beam and trim weren’t perfectly straight either.  Sadly, I don’t have pictures, we were that absorbed by this conundrum.

It wasn’t until after our vacation that we solved it.

Weekend 3:  Pull trim off, re-attach, seal, prime and paint!

There was a lot of brainstorming this weekend.  On Saturday, we actually (carefully) ripped off the trim on the back of the beam.  Then we nailed the end cap to the front trim, by first partially driving nails through it, then having multiple hands hold it while hammering.

Once that was in place, we attached the back trim with a screw.  Lined it up with the end cap, and fixed it in place with a second screw.  We then nailed it and the end cap in place completely and removed the screws, applied wood putty over all the nail holes and called it a day!

On Sunday morning, we caulked all around where the beam and the trim met.  I sanded down the wood putty and then primed the whole thing:

Then painted.  This was the most exciting part:  our house was BACK!

Yeah!

Everything is back in place and looking great.  Though I think it just inspired us to pick at all the other beams, patch them with epoxy, and replace the siding.  Wouldn’t it be great if everything were as crisp and freshly-painted as this beam and trim?

But just for now, perhaps it’s time to pause and enjoy some fluffy, happy clouds and pat ourselves on the back.

I need to catch my breath a little, before the next project.

To see where we started, check out my post:  beam repair, part 1.

diy projects

living wall project planning

July 15, 2013

Hi friends!  I’m back from the tropical paradise that is Maui, Hawaii and sadly, I’m rather under the weather (allergies, I think).  I was hoping to finish our beam repair project this weekend, but alas, I’ve been on decongestants and antihistamines and, mainly, my face for most of the day.

But, what’s better than lying around sick and bemoaning unfinished projects?  Lying around sick and planning new projects, of course!

On Saturday, before I took a turn, David and I ventured up to San Francisco.  Among other things, I stopped in at Paxton Gate to confirm that yes, their living wall is still awesome, and yes, I am still pining for one.  Then we found our way to Flora Grubb Gardens.

Living walls at Paxton Gate (left) and Flora Grubb (right)

I love plants and Flora Grubb has a selection beyond what my local nurseries carry.  And, I spotted their version of the living wall made with Woolly Pockets attached to a sheet of plywood.  DIY ideas instantly came to mind.

Here’s the plan:

  1. Frame the back of a, let’s say, 4×6′ sheet of plywood with some 1-2″ lumber.
  2. Cut a piece of the same lumber to make a wood cleat for hanging.  Attach half of the cleat to the back of plywood.   (See woodworking master Ron Hazelton for how to hang pictures with wooden cleats if you’re interested.  His videos are so helpful.)
  3. Hang the plywood frame in the atrium, by attaching the other cleat to our siding.  On the wall where our useless bougainvillea used to be.
  4. Attach rows of Woolly Pockets across the entire surface of the plywood, run drip irrigation through, and then plant like crazy!

I like this project because a) I’ll get to do something fun in our atrium, b) I get to buy plants! so many plants!, and c) it justifies the purchase of a table saw.  Trifecta.

Other appealing aspects:   This will be much more affordable than the Paxton Gate installation even with the purchase of a saw.  And I know that our siding will be protected from moisture, thanks to the material used to make Woolly Pockets and the added distance the plywood frame will provide.

Now, let’s see what else I can plan up tonight!  Have a great week everyone!

All photos by Karolina Buchner

projects weekend

weekend project: beam repair part 1

June 19, 2013

dear house,
i love your beams.
i really, really do.
xo
karolina

 
This weekend, Dave and I embarked on the first serious repair work we’ve ever attempted on the house:  fixing a beam affected by dry rot.

Sure those exposed beams are pretty, but they take a beating thanks to the hot California sun in the summer and torrential rain in the winter.  This beam in particular is on the more exposed side of the house without a roof overhang to protect it and it’s in a sorry state.

After noticing some chipping paint a few weeks back, Dave took a toothbrush to it and found that he was able to brush away a lot of the wood out of the beam as it disintegrated into dust.  Leaving gaping holes.

Brace yourselves.

Pretty horrific.

BUT since the beam rot doesn’t affect anything structural (it stops about a foot shy of that post, which, yes, is holding up our roof) we’ve decided to have a try at repairing this ourselves.

Here’s our plan of attack:
  1. Remove the decorative outer trim (the beige stripe) surrounding the beam.
  2. Strip the paint from the beam (and heck, why not strip the post supporting the beam while we’re at it!)
  3. Chip out as much of the dry rot as possible from the beam, until only stable wood remains.
  4. Treat the wood with wood hardener or ‘consolidant’ as the pros call it.  (We’re using Minwax Wood Hardener.)
  5. Patch the beam with epoxy filler.  (We’re using Bondo, which you can get at car repair shops and some hardware stores.)
  6. Sand the beam back to its usual profile.
  7. Re-apply the trim, caulk, prime, and paint!
Should be easy, right?

Before starting the work, we had a chat with a local contractor to make sure our plan wasn’t completely crazy and, of course, consulted the internet and watched endless minutes of fix-it shows and demonstrations of this and that wood repair wonder product, wherein I may have developed a soft spot for this man.

We got through steps 1 and 2 this weekend.  Mainly because we do not own many power tools, and had to lovingly hand-saw through the trim.
As a side note, after reading Karen’s post over at Destination Eichler (which you should check out!) about shou-sugi-ban, a Japanese technique for preserving wood, I was fascinated to find that the edges of the original trim had obviously been intentionally burned.

All of the 45 degree joint edges were charred black!  I wonder if this was a common practice in Eichler construction, or if it may have been particular to the builders who worked on our house.  Oh, I do love me some good house archaeology.  The intrigue!

Anyway.  Ew:

The house now has some serious ‘This Old House’ curb appeal.  I keep telling myself it gets worse before it gets better, but it’s certainly cringe-inducing to look at right now.  Stay tuned!
interiors projects

yahoo! labs

June 11, 2013

dear house,
sometimes i can get all crazy and design and paint and furnish whole floors of other buildings!
i know, i scare myself too.
xo
karolina

I’ve been meaning to share this side-project I did last year:  I designed a new space at my office!  Those of you who know me well, know that I work for a certain Internet giant, which has seen its share of rough times and a renaissance of sorts at about the time I did this project.  I just passed my 7-year mark there last week, so this seems like good timing to share!

First, some back story:  Mid-last year, the head of lab was relocating all of us (or, erhm, what was left of us) to a new floor on our main campus, and soliciting ideas for how to improve the space and make it our own.  I sent a few thoughts by email and somehow ended up volunteering to take on the whole project.  In my spare time.

This involved creating a new lounge space for people to hang out in and discuss ideas (whiteboards are critical in such places), a library area to house all three million of their old computer science tomes, and a general refresh of the hallways where our cubes were located.

Somehow I was lucky enough to be given a pretty free rein with what to do with the space, within reason and without major reconfiguration.  The most enjoyable part was completely gutting a conference room and turning it into a super-geeky, super-fun lounge space for my fellow scientists and engineers.

Here’s what we started with:

Yawn.  And dark.  And …. ew.  I secretly want to know where the inhabitants of this space found the baby-poop-yellow leather chairs.

I went through some rounds of consulting with my ‘clients’, i.e., colleagues and managers, and pitched a look including full-on mood boards and pins, colour schemes, furniture options, and budgets.  I had a blast and I think they did too.  I don’t think research scientists tend to review interior design proposals very often and were quite amused to do so.  It was great to have something fun for us to rally around and to see the transformation take place.

Enough background.  Let’s have at it, shall we?

The lounge room:

Yeah, take that boring conference room tables!  For reference, this is the room pictured in the bottom left of the before shots.

So what’s in here?
 
The orange sectional was from our office furniture inventory and the starting point for the room design.  The white chairs came from AllModern and I could spin and spin in them all day if given the chance.  Clear acrylic coffee table actually sold as a media console is from CB2.  The throw cushions and tripod floor lamps were also from CB2.  Wood stump side tables from West Elm.  FLOR tiles are the ‘Dashed Off’ style in black and white.  I looooove these and they really made the room.

We also got a big ol’ fiddle leaf fig tree installed behind the sofa, after months of waiting for it.  Sadly it is not pictured, as my patience ran out and paranoia about things becoming disheveled set in around the time these pictures were taken.  Please imagine it in all of its green, figgy beauty in the corner on the left.

My design geek heart is happy that I got to incorporate the Flensted mobile.  It acts as a sort of chandelier to add a bit of dimension to this otherwise white box.

Speaking of white:  you’ll notice we ripped out the whiteboards.  To make sure plenty of brainstorming could happen in here, we painted the two main walls with IdeaPaint, which turns the whole wall into whiteboard.  It’s been holding up really well and gets used a LOT.

Another space was this little ‘library’ corner also nearby the lounge room (pictured before in the lower right).  This is in an area next to a bunch of conference rooms so it’s generally quiet.  A nice place to take a break away from one’s cube and read up on machine learning theory and computational linguistics, as you do.

Resources:  Lightbox table from Gus*Modern; white chair, AllModern; awesome spherical stools from Zuo Modern via Amazon; floor light from IKEA; globe and other accessories all thrifted; bookshelves from our office furniture inventory; scientific tomes all property of Yahoo! Labs

Throughout the halls, after taking painting most of the dark, dingy stuff out in white, we added some blocks of bright colour, chalkboard walls for more collaborative scribbling, and art.  I got a few prints from Society6 which I really enjoy to add interest without being overly rah-rah motivational or corporate, plus they came framed which made things very easy.

The red print is Kuala Lumpur by Steven Toang, the black Scandi-style print by Marcelo Romero, and the two technicolor landscapes by Tchmo.

We also started a tradition of taking everyone’s picture and adding it to the big ‘wall of fame’, with a janky old Polaroid camera and film made by the Impossible Project.  Now when any new folks join, getting their pic taken is part of the welcome.

That paint colour, by the way, is Outrageous Orange by Benjamin Moore.

A huge THANK YOU for her advice and support goes to Alena Wallace, who is an actual designer and was super sweet about letting me try out my ideas.  The FLOR tiles were Alena’s suggestion and added a certain 2001: A Space Odyssey feel to the lounge that I love so much.  Alena, you rock!

I look back on this and think I was totally crazy to do it.  Almost all of it was done after-hours, except where contractors were involved and when colleagues were conscripted to help with furniture assembly.  I thrifted for props to style bookshelves and arranged them on a weekend.  On a weeknight, I got my husband to assist with installing things and hang up the prints.  I agonized over paint colours in my sleep.   I stalked our real estate and workplace team to get approvals for my plans (and was so lucky that they were cool with it).  And I had waaaaaaayyy too much fun.

And now when I see my colleagues having brainstorming sessions in that room, using the whiteboard walls, spinning around in the white chairs, I feel all warm and fuzzy inside.  I would totally do it again.

landscaping projects weekend

a little landscaping: horsetails + beach pebbles

May 14, 2013

Hey all!  How was your weekend?  Hope you all had a lovely Mother’s Day.  After calling my mom at midnight on Saturday (she’s nine timezones ahead of me right now), mine ended up being all about this little patch of horsetails just outside our atrium, at the front door.

After years of looking at the same sad, lonely-looking horsetails and mystery ground cover, I decided to rip the ground cover out and add more horsetails to give the original plants some company.  I’m learning that more is better in landscaping too, as in, more of the same thing.  For impact!  So this weekend, I decided to go all out and get the plants, pebbles, and landscaping fabric.  We got all fancy, yes, we did!

Learning #1:  horsetails are known by their genus Equisetum.  They’re one of those ‘living fossil’ plants.  And they run like bamboo.  I do find them popping up in the atrium, so planting more is probably fool-hardy.  We’ll see.

Learning #2:  those beach pebbles weigh a TONNE.  If you ever want to take on a project like this, make sure you have an extra set of hands to help lift the bags those suckers come in.  And you’ll need more than you think.  We used about 4 1/2 bags for this small space (maybe 2×6 feet).

It was nice to improve our curb appeal just a little.  Or maybe it’s just front-door appeal?  It’s nice to come home to either way.  It also temporarily satisfies my dream to re-do our landscaping all around the house.  I’d love to do something more angular and modern, and have been scouring the interwebs for ideas.

Sources (clockwise from top left): The Lovely Plants, Houzz, The Brick House, Japanese Trash

Raw steel, grasses, succulents, cacti, agaves, architectural pottery, pristine new pavers, and hanging chairs.  WANT.  Ugh.

A complete re-do is a long term project that I’m working on, as I’ll need a professional to do it.  Terraforming on a larger scale than this weekend is beyond my physical powers.  For now, I’ll enjoy my horsetails when I come home at the end of the day.

diy projects weekend

weekend project: staghorn fern mount

April 8, 2013

Hello all [four readers]!  You’re probably wondering what I was up to this weekend.  Dying to know!  I get it!

Before I get to the pretty below, it must be noted that the major time-suck this weekend was due to my abrupt realization that we absolutely need to power-wash our concrete patio slabs.  Which we did.  For a number of hours on Saturday.  To not entirely satisfying effect.

Our concrete is the original and it’s looking rough these days.  After a winter under a layer of algae, the concrete in the atrium is now pock-marked with black spots that refuse to be removed.  Now that I have grossed you out, let’s move on!

So:

closeup of fern fronds

Yeah!

I FINALLY got around to mounting my staghorn fern.  It’s been growing like crazy, but sadly still in its original green plastic pot from the nursery.  This meant I needed to built a mount for it.  Fun times!

A week or so ago I picked up a scrap of plywood from the hardware store and decided to sacrifice one of our tomato stakes for this project.  After some sawing and drilling, I had a simple mounting board assembled.  Last weekend I picked up a fancy package of sphagnum moss at Paxton Gate (we happened to be in the city, and everything at Paxton Gate is so delightfully weird that I couldn’t resist.)  I later found that a very similar sphagnum moss is available at our local Ace (which I love!) for about half the price.

To mount the fern onto the board, I followed Apartment Therapy’s how-to but was not entirely convinced about having fishing line and a few nails supporting the fern.  After packing the moss and wrapping it with fishing line, I grabbed a square of burlap and stapled a skirt on this guy, to add more support.  It even has a little fringe.  Hey, maybe this fern likes skirts.  And fringes.  Don’t judge.

burlap cloth over fern roots

It’s looking much more dignified than it was in its plastic pot, sitting on my bathroom floor, occasionally being kicked over, and spilling its dirt.  Oh!  
I’m happy with how it turned out, even with the extra burlap.  And the fern looks happy too.  Awww.
diy hobby room lighting projects weekend

weekend project: sconces in the hobby room

March 27, 2013
wood paneled room

I’ve been trying to figure out what to do with this room for just about 2 years now.  It is starting to come together and I’m pretty excited.  You can check out the previous incarnations of my plans for it here and here, … oh and here!

I love the mahogany walls.  But they make this, hands down, the gloomiest room in the house.  Those walls = love + gloom.  SIGH.

To try and bring the 2+ years of over-thinking to a close, I did seek professional help whilst attending AB Chao’s Dewit Design Camp last year.  AB very helpfully suggested sconces on either side of the sofa.  And since this is going to be a man-cave no matter what, we decided it had at least be a very well-lit man-cave.  I’ve been hunting and scheming ever since.

My first attempt back in January involved George Nelson Bubble lamps since I wanted maximum un-gloominess.  They were pricey and very, very pretty but they were just… not…. right.  Not enough light and weirdly too large for the room.

I think I knew all along.  What I really wanted to try were silver-tipped bulbs in super-simple sconces.  Like these from The Brick House.  Or perhaps a bit more sleek and modern, like the Artemide Teti in black, which turns out to be really hard to find.

I was worried that the sconces might just light up part of the walls, which absorb all light like giant, mahogany sponges.  However, with DWR refund now in hand, I figured I could do this for much less than the Bubbles, and make them custom.  Custom = so much more fun!

light fixture on wall

Cute, right?

They may be wee, but they are bright.  And I am quite happy with how they turned out.  They fit in really well with the aesthetic of the room.

light fixture off and on

Here are the goods required:

supplies to make the lamp
(Clockwise: cloth-covered cord, silver-tip bulb, offset plug, on-cord switch, back
 plate, ceramic lightholder. Maybe $50 total. I think the bulb was the priciest thing here, at $8.)

The offset plugs are great for plugging in behind the sofa, allowing us to push the sofa up against the wall without worrying about cords getting mashed, as they do.

offset plug detail

Of course, we triple-tested everything we wired using the multi-meter that Dave got for Christmas.  Because we are NERDS.

metal plate attached to wall

I drilled through the lip of the metal back plate (the hole is visible at the bottom).  With a regular drill, which required some patience/foolhardiness.  I kept it as just a hole rather than a notch in the edge of the plate, for reasons I can’t quite explain.  A notch would have made assembly SO much easier (no threading of cord through the hole).

Also, gloss spray paint on ceramic looks surprisingly OK:

ceramic socket attached to metal plate

Basic how-to:
  1. Paint.  I used spray primer and then with gloss black spray paint.
  2. Drill holes in the metal back plates to accommodate cord.
  3. Mount back plates to wall.  We used a laser level to make sure they lined up.
  4. Wire and assemble!*

I found most of my materials at the local hardware store and ordered some cloth-covered cord from Grand Brass.  The silver-tipped bulbs are from 1000 Bulbs.

*Disclaimer: I am not an electrician so assemble at your own risk. The ceramic lightholders are meant to be mounted on top of electrical boxes. I can report no electrical fires so far.

As a fun bonus, in the process of putting up the lights, I mocked up my whole vision for the wall using masking tape.  You really don’t need to see a picture of that since it was quite hastily done and very lopsided.  Trust me.  Upshot:  Now I know that I want a 4×5’ piece of art.  That should be both affordable and really easy to find, right?

While I ponder that, please enjoy this gratuitous shot of Winston appreciating the room, post-lamp-installation:

small dog on sofa

All photos by Karolina Buchner